This recipe is in dedication for Tayde, who was a former patient at St. Jude’s Children Hospital, a childhood cancer(acute lymphoblastic leukemia) survivor, and now a healthy mother of two. Her floral-themed art pieces were featured at the Creator’s Summit at St. Jude, which I was lucky enough to attend(thank you, Shari from my first season of Masterchef for inviting me!), and I felt like recreating her art in cake form was the most appropriate way to honor her story, and recapture that sense of hope she must have felt when she overcame all of her bouts with cancer. The art pieces featured these gorgeous flowers that sprouted out of the ground, which was speckled with teal, indigo, orange, and white spots. I knew that I could capture those colors in some kind of dessert, and my mind went to a cake with colorful smears of buttercream covering the whole thing, with buttercream flowers decorating the exterior as well. I knew there were three things that must be done with this cake – 1. honor Tayde’s art and story, 2. the flavors must reference Memphis, Tennessee, since that is where St. Jude’s headquarters are based/where Tayde received her cancer treatment specifically, and 3. the entire dessert must be 100% naturally colored. There is something that makes a recipe even more beautiful, in my opinion, when a recipe is naturally colored. You don’t have to make this recipe with natural coloring, but I opted to, since it only felt right to do so given natural food colorings tend to be healthier for you anyways!

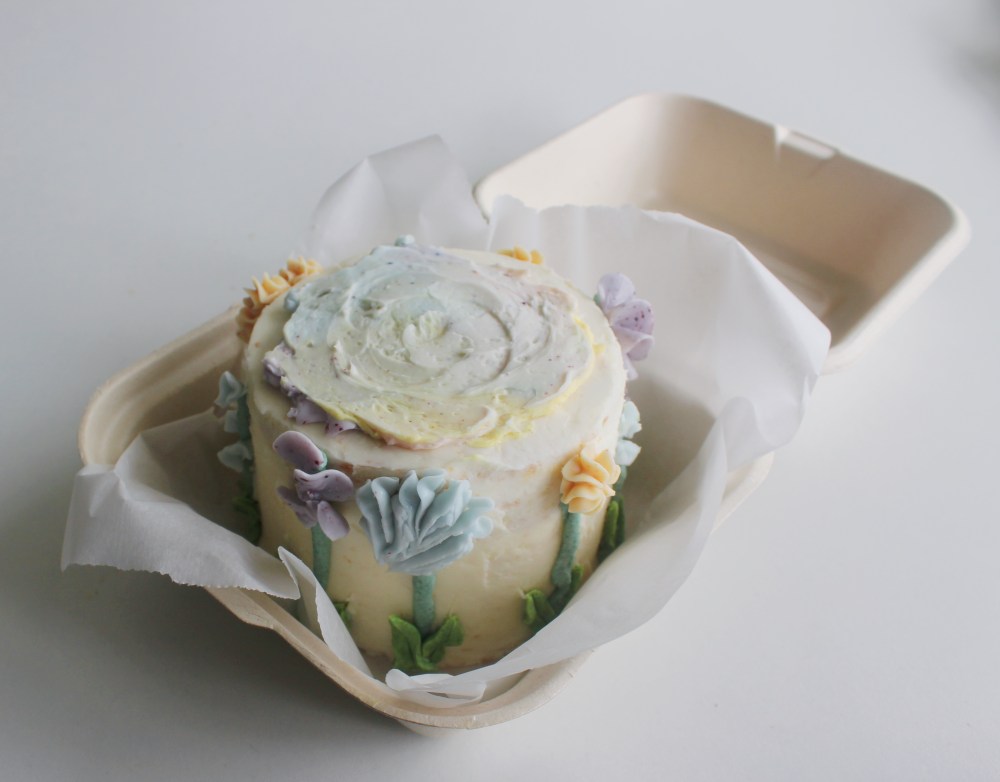
So with that in mind, I wanted to use buttermilk in the cake. Southern baking uses buttermilk all the time, and it produces this soft, airy texture in the cake. I also wanted to make the entire cake a loose homage to moon pie’s, which are native to Tennessee, so I went with a Swiss meringue buttercream, which is really close to a classic a marshmallow buttercream. Normally moon pies are coated in chocolate, like a choco-pie. But in this case, coating the cake in chocolate would have covered all the beautiful colors I was coating the cake in. So instead, I went with the chocolate as a filling, in the form of an orange-cinnamon ganache. The orange and cinnamon add spice and a little tartness, which brighten up the cake, and prevent it from being on the plain-Jane side of things, especially since this cake should be anything but plain-Jane, given both the inspiration driving it and the actual appearance of it. I went with orange and cinnamon specifically because I wanted floral ingredients in there, but I did not want to go with something super strong like lavender or rose, and wanted to use something that would complement the chocolate filling instead of potentially clashing with it. So, the cake will still taste like a moon pie, but the components are essentially turned inside out! I also wanted to make this recipe a lunchbox cake, since I found them to be a lot more cute and fun in that sort of mini form. That and there’s a really fun feeling when you see a couple of these cakes lined up next to each other.

In terms of technical difficulty, this cake is mildly challenging. The sponge itself is a chiffon-like sponge, made with lots of whipped egg whites and egg yolks. And the buttercream, being a Swiss meringue buttercream, requires a lot of whipping and whisking as well. So long as you have a stand mixer though, that eliminates a lot of the whisking/whipping-related challenges in this recipe. And trust me, you’ll need one for the buttercream. What separates a meringue buttercream from an American one is, as the name implies, that a meringue is first made by whipping egg whites with sugar, and then that is emulsified into butter to form your buttercream. Compared to American buttercream, which is made by whipping butter with powdered sugar, a meringue buttercream is lighter, a lot less sweet, and a lot more stable from being made out of an emulsification. To avoid salmonella from raw egg whites, the two types of meringue that are used for buttercream are Italian or Swiss. With Italian, you cook the egg whites by pouring a boiling hot sugar syrup into them while whisking them, which kills the bacteria. Italian meringue buttercream is, in my opinion, easier to make than Swiss meringue, but I find that the texture of Italian meringue buttercream, when chilled down, is a lot harder and less pleasant to eat. Whereas with a Swiss meringue, it is first made by whisking egg whites and sugar over a double boiler, which kills off the germs that way, and once the sugar is dissolved into the egg whites, then you whip the two, off heat, into a stiff, Swiss meringue that way. Swiss meringue is a lot more stable than Italian meringue, since the water content is lower in general, and I prefer using Swiss meringue buttercream in layer cakes for that reason specifically!

On top of the meringue buttercream and the cake, I would say the other main challenge is balancing your temperatures and waiting times, specifically because of the nature of the buttercream. The ganache filling cannot be hot when you spread it into the cake, or it will melt the buttercream, leak out of the sides of the cake, and ruin the final presentation. Additionally, getting a nice enough crumb coat of the buttercream frosting onto the exterior of the cake is important, since you really just want the cake to be a blank white canvas that is being contrasted with the bright colors inspired by Tayde’s art. The color of the buttercream can be tricky too, if I am being honest. I found myself portioning out too much of the buttercream for the colored components, and not having enough to frost my third cake all the way through. You realistically only need about 2 tbsp of buttercream for each flower you are making, and even that is being generous. Coloring each portion of buttercream was really time-consuming as well, so I recommend grabbing a chair and sitting while you’re doing it. However, my favorite part was also buttercream-related, being the final assembly. Piping on the vines and leaves, placing on the flowers, and then spreading the buttercream on top, it was all kinds of fun, and I really enjoyed doing it! All in all, I am thankful to St. Jude (and Shari), for inviting me to their summit, sharing their stories with me, and giving me the inspiration to make this colorful cake!
Make 2-3 lunchbox cakes:
For the buttermilk cake:
2 eggs, separated
1/4 cup granulated sugar
3 tbsp milk + 1 tbsp vinegar
2 tbsp canola oil
a pinch of cinnamon
a pinch of nutmeg
1 tsp vanilla extract
1/2 cup all-purpose flour
1/2 tsp baking powder
In a bowl, whip the egg whites with sugar to stiff peaks. In another bowl, mix the egg yolks with milk, vinegar, canola oil, cinnamon, nutmeg, and vanilla. Then sift into the egg yolks the flour and baking powder, then fold into that the whipped egg whites to form your batter. Spread the batter in a lined quarter sheet tray in an even layer. Bake at 350 degrees F for 18 minutes. Allow the cake to cool before cutting out 4-inch rounds, pushing together scrapes as necessary to form additional rounds. I pushed all of my scraps into 2 4-inch ring molds.
For the soak:
1/2 cup buttermilk
a pinch of cinnamon
1/4 tsp vanilla
a pinch of salt
Mix together to form your soak. Brush onto each cake round, and generously soak the scrap rounds. Transfer your cake rounds to the freezer, as this will make assembly a lot easier if the cake rounds are frozen solid.
For the orange-cinnamon ganache:
3oz dark chocolate chips
2oz heavy cream
1oz unsalted butter
a pinch of salt
a pinch of ground cinnamon
1/4 tsp orange zest
Over a double boiler, melt everything together. Allow the ganache to cool before attempting to use.
For the Swiss meringue buttercream:
4 egg whites
1 cup granulated sugar
3 sticks unsalted butter
a pinch of salt
vanilla extract
turmeric powder
acai powder
blue spirulina powder
green spirulina powder
red beet powder
In a bowl, whip together the egg whites and sugar over a double boiler for 1 minute, or until the sugar is fully dissolved into the egg whites. Then transfer the whites to a stand mixer with a whisk attachment and begin whipping air into them, until they are white in color, and cloud-like in texture. At that point, start mixing in the room temperature butter, salt, and vanilla. Eventually, with enough whisking, everything will combine into a smooth buttercream. From there, portion out about 2 tbsp of frosting for each flower color(orange, indigo, teal), as well as another 1 tsp each for the leaves, stems, and pink spots(bright green, dark green, and pink). With the remaining uncolored buttercream, we will be using that for assembly. With the flowers, pipe them, using either star or petal-shaped piping tips, onto parchment and then freeze them. You’ll want at least 12 of each piped flower, since each cake will be decorated with 9 flowers total. With the green buttercreams, place them both into piping bags, as you will be using the dark green for stems, and the light green for leaves(be sure to use a leaf piping attachment for the leaves!). With the remaining colored buttercream, keep that at room temperature, since you will be spreading that all on top of the cake.
See below for which ingredients correlate to which color:
acai + blue spirulina = indigo
blue spirulina = teal
turmeric + red beet = orange
red beet = pink
green spirulina = dark green
turmeric + green spirulina = bright green
I would recommend adding the powders, one pinch at a time, to the buttercream, just to better control and regulate the colors that you get at the end.
For initial assembly:
Start with a round of the cake. Pipe a border along the round with the white buttercream. Then add to the center some ganache. Repeat with the next round. Then add on the final round. Gently spread on enough buttercream to just cover the cake. Then transfer to the freezer. Repeat with your other cakes as well. You want each cake to freeze for about 1 hour.
For final assembly:
Take the frozen cakes, and then apply on the rest of the white buttercream, spreading that in an even coating around each cake. Then pipe on the dark green buttercream vines, then the light green buttercream leaves. Press the frozen buttercream flowers onto the vines, and then with the remaining colored buttercream, spread that on top in an even layer.

