This was actually a cake order from a couple that I met at my friend Sylvie’s birthday party. They were incredibly sweet and fun to talk to, and we hit it off almost right away. So when I was contacted to make a cake for one of their birthdays, I immediately had to say yes! The primary requests in the order were to go with either an Earl Grey-lavender situation, or a green tea-Matcha one, so I opted for the former, namely because I had a vision on what I wanted to do with Earl Grey tea and lavender! What I love about Earl Grey is that it is a black tea that contains citrus(bergamot, which is fairly acidic, subtly bitter, and pleasantly zesty) and lavender as well, so going that route, coupled with the lavender flavoring, means that I can veer on the more subtle side with actual lavender flavoring, and still end up with a cake that will taste of lavender regardless. The Earl Grey and lavender work together like having a lavender-flavored safety net in this recipe, if you will. One of my favorite Earl Grey-related beverages is London Fog, which is an Earl Grey milk tea that sometimes contains orange zest in it. I love using London Fog as a base-line flavor inspiration, so I figured I would bring it back with this case, since it had been a solid 3 years since I last made anything London Fog-flavored! In this case, we went with an Earl Grey cake with a London Fog soak, tangerine curd, and a lavender Swiss meringue buttercream. I opted for tangerines instead of oranges in this recipe, since tangerines are less sweet, and I wanted this cake to be more balanced. The last thing I wanted was to present a cake that was too sweet.

In terms of the components and their difficulty level, I would say that the buttercream would be the most technically difficult, followed by the cake, the curd, and the soak. This is because Swiss meringue buttercream requires you to whisk the sugar and egg whites over a double boiler until the sugar is dissolved/the egg whites are pasteurized, then whisk them to stiff peaks, and emulsify butter into that. Meringue-based buttercreams are tricky, especially for those who have never made one before, because when the butter mixes into the meringue, it separates first into a coagulated, baby vomit-looking mess, but with enough mixing, it comes together into a smooth cream. This recipe requires a lot of whisking, but if you own a stand mixer with a whisk attachment, I will actually say that the buttercream’s difficulty level actually goes down pretty dramatically(this entire recipe’s difficulty level goes from about a 9/10 when not using a stand mixer to about a 5/10 with using one). I would never make a Swiss meringue by hand, simply because you will find yourself whisking for upwards to an hour just to get the meringue stiff enough(when you add sugar to egg whites, that causes the whipping time required for them to reach stiff peaks to increase, which is why typically whisking meringue by hand, you whisk the egg whites to soft peaks first, then add the sugar, something that Swiss meringue doesn’t allow since you have to whisk the un-whipped egg whites with sugar from the jump). If you don’t own a stand or electronic mixer, you can also do an Italian meringue buttercream, which you can do by making an Italian meringue instead of a Swiss meringue. You can do this by taking the sugar from this recipe, bringing that to a boil with 1/4 cup water, and pouring that into soft peak-whipped egg whites while whisking. From there, just add in the butter and other ingredients, and you have yourself an Italian meringue buttercream, no electronic mixer required!
The other technically difficult component would be the sponge. The cake, being a chiffon batter, requires a lot of whipped egg whites. The technical aspect of the sponge is knowing when to mix/fold ingredients together. The flour and whipped egg whites are the last two things you are two add to your batter, otherwise the batter can turn tough, deflated, or chewy. Chiffon cakes require a delicate hand, all in all, but they have an undeniably fluffy and light texture that is universally loved and appreciated! Chiffon cakes can be very temperamental as well, and prone to deflating. However, since we are baking it in a sheet tray instead of a classic chiffon cake tin with the chimney/funnel running through it, this cake bakes up quickly, just as fluffy, but with very little risk of you deflating the sponge itself. I did use a spice grinder to finely grind down the earl grey leaves into a powder, which is being used to accent the cake with Earl Grey flavor, on top of using some actual brewed Earl Grey tea in the batter to further bolster that. If you don’t have a spice grinder, then you can double up on the Earl grey tea, but reduce it down by half before adding it to the batter – what I mean here is brew 1 1/4 cups of Earl Grey tea instead of the 1 cup, and then take 1/3 cup of that 1 1/4 cups, reduce that 1/2 cup down to 2 tbsp, and then add that reduced tea instead. This, coupled with the soak, will guarantee that Earl Grey flavoring will come through! The soak, the only technical part is making sure that you steep the tea bags in the water for those 24 hours. The longer you steep the tea in the water, the stronger it will come through, so it really becomes a waiting game.
Makes 1 6-inch, 3 layer cake:
For the Earl Grey tea:
3 bags Earl Grey tea
1 cup warm water
a pinch of salt
Along with the soak, the other component that doesn’t shift in difficulty if you have a stand/electronic mixer would be the tangerine curd. The curd is made by whisking egg yolks, tangerine juice and zest, and cornstarch together, and finishing it with olive oil. You can use butter instead of olive oil as well – both would introduce a much-needed fat to the curd, taking off some of the acidic edge, and making the curd palatable as a dessert. I prefer olive oil, since the grassy notes in it play off of the bitter notes in the tea, but butter works just as well here in either case. The thing to be mindful of is the temperature the flame is at when you are whisking the egg yolks over the stove. The egg yolks run the risk of scrambling if you leave them on heat for too long, or at too high of a temperature. It is safer to use a lower flame, and be sure you whisk with urgency – the slower you whisk, the more likely that the eggs will curdle and scramble. The whisking constantly disrupts that process, allowing the heat from the flame to evenly distribute through the curd liquid, gradually thickening it, gelling the cornstarch and the egg yolk, and creating a luscious, smooth, custard-like textured curd, which is what you want. If you somehow manage to scramble your curd, pass it through a sieve. If the curd is too thick and scrambled to strain it through a sieve, transfer it to a blender, add to that the juice from another tangerine, puree that all together, and pass it through a sieve. The curd’s biggest difficulty point is making sure that it is the right consistency. It’s okay if it is too thin, since you can always return to to the stove to re-thicken it. You ideally want it to be thick enough to cling to the sides of your whisk, and to generously coat the back of a spoon. So long as you can get it to that texture, you are good to go on the curd itself!
Combine the ingredients in a heatproof container and cover. Allow the tea to steep in the water for at least 1 day before straining out the bags.
For the Earl Grey cake:
1/2 cup granulated sugar
1 bag Earl Grey tea leaves
4 egg whites
2 egg yolks
3 tbsp canola oil
2 tbsp Earl Grey tea
2/3 cups all-purpose flour
1/2 tsp baking powder
a pinch of salt
In a spice grinder, blend up the sugar with tea leaves into a fine powder. Whip the egg whites with the Earl Grey sugar first to stiff peaks. Then in another bowl, whisk the egg yolks, canola oil, and tea together first. Sift into that the flour, baking powder, and salt, and then fold into the flour-egg bowl the whipped egg whites to form your batter. Spread the batter in a parchment-lined quarter sheet tray in an even layer, and bake at 350 degrees F for 18 minutes. Allow the cake to fully cool before cutting out 3 6-inch rounds of the cake, using the scraps as necessary for the third round.
For the London Fog soak:
1/2 cup Earl Grey tea
1 tbsp milk powder
Mix the two ingredients to form your soak. Distribute the soak amongst your three cake rounds, and transfer those to the freezer. Ideally you want the cake rounds to be frozen-solid for assembly.
For the tangerine curd:
Juice and zest from 4 tangerines
2 egg yolks
3 tbsp granulated sugar
1 tbsp cornstarch
a pinch of salt
1/2 tsp vanilla extract
2 tbsp olive oil
In a pot, reduce the juice and zest from the tangerines by half. In a bowl, whisk the egg yolks, sugar, cornstarch, and salt together. Pour half of the reduced juice over the egg yolks and whisk. Then add the egg yolks back into the pot with the juice, and whisk on medium heat until the mixture begins to cling to the sides of your whisk. Pass the curd through a sieve into a small bowl or container, and whisk into it the vanilla and olive oil. Press the top of the curd with cling wrap, and refrigerate until cool to the touch.
For the lavender Swiss meringue buttercream:
3 egg whites
1/3 cup granulated sugar
a pinch of cream of tartar
3 drops lavender extract
a pinch of salt
1 tsp vanilla extract
2 1/2 sticks unsalted butter, cubed and at room temperature
1/4 tsp acai powder or 1 tsp purple taro powder
Over a double boiler, whisk the egg whites with sugar and cream of tartar until frothy, and the sugar dissolved. Transfer the egg whites to a stand mixer with a whisk attachment, and whip to stiff peaks. Add in the other ingredients at this point, and whisk on slow first, slowly increasing the speed of the mixer as the butter and egg whites gradually incorporate together.
For assembly:
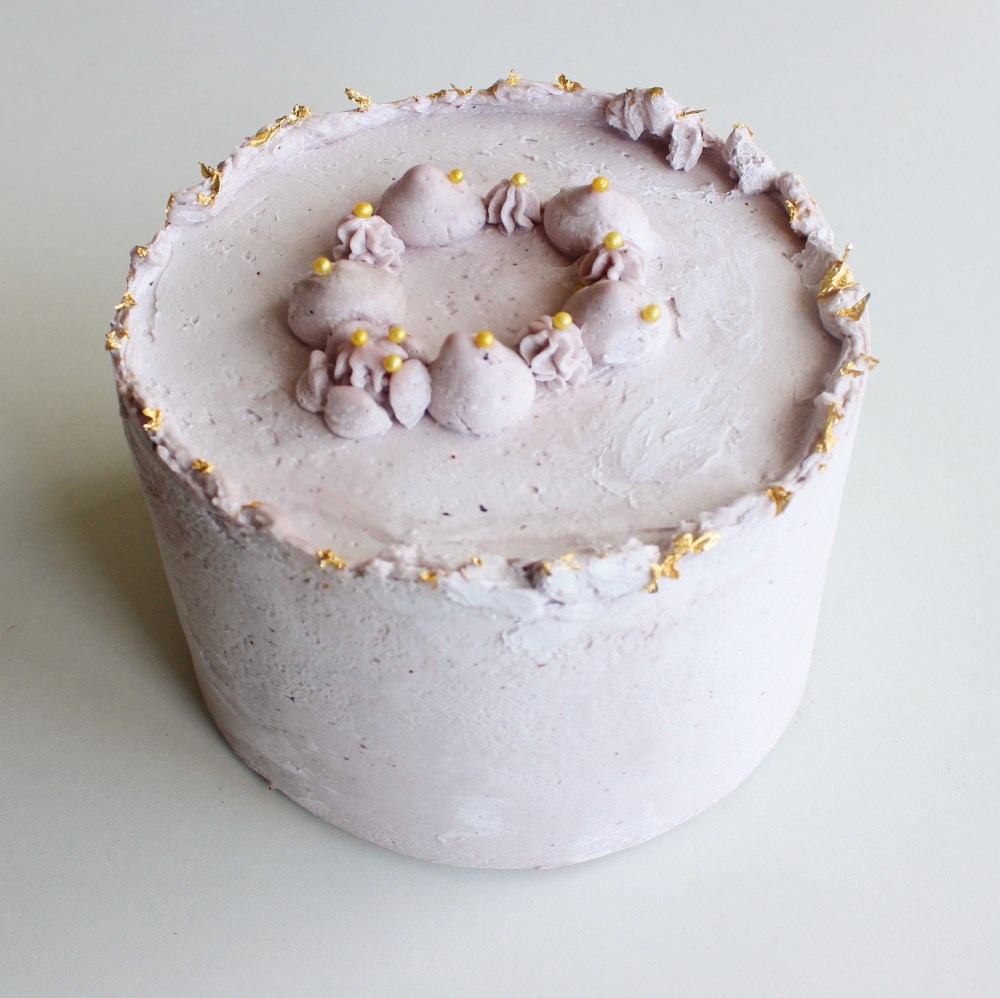
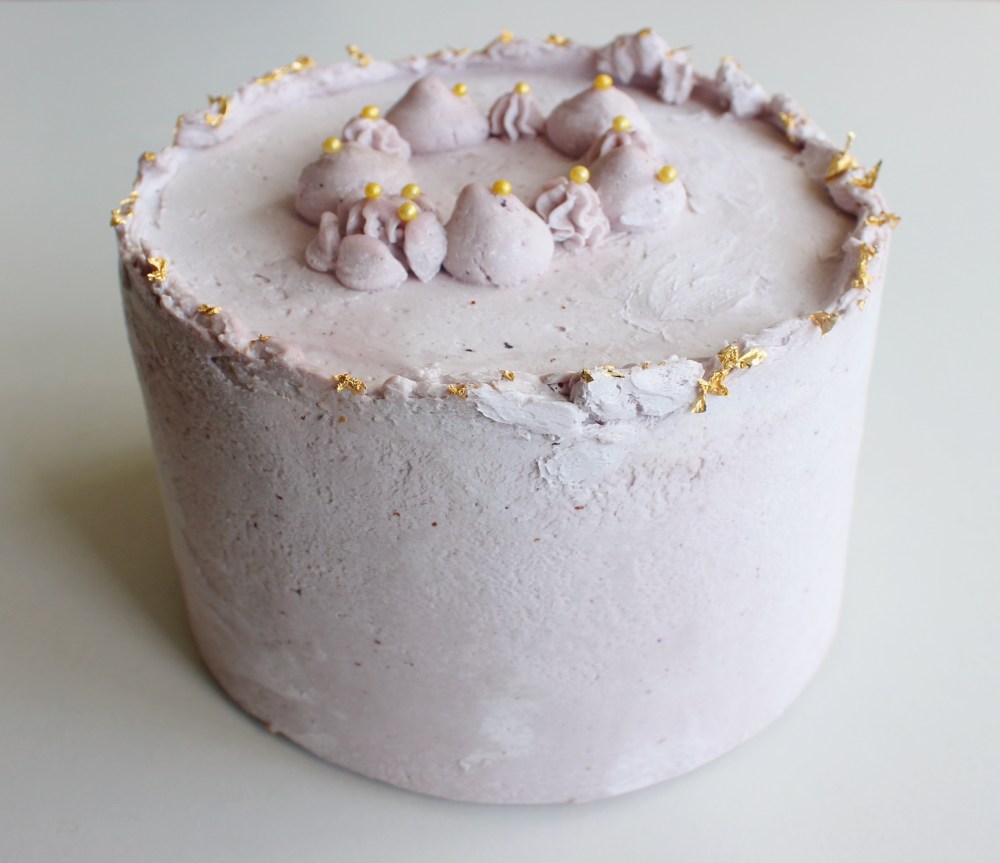
Gold leaf
Gold edible pearl sprinkles
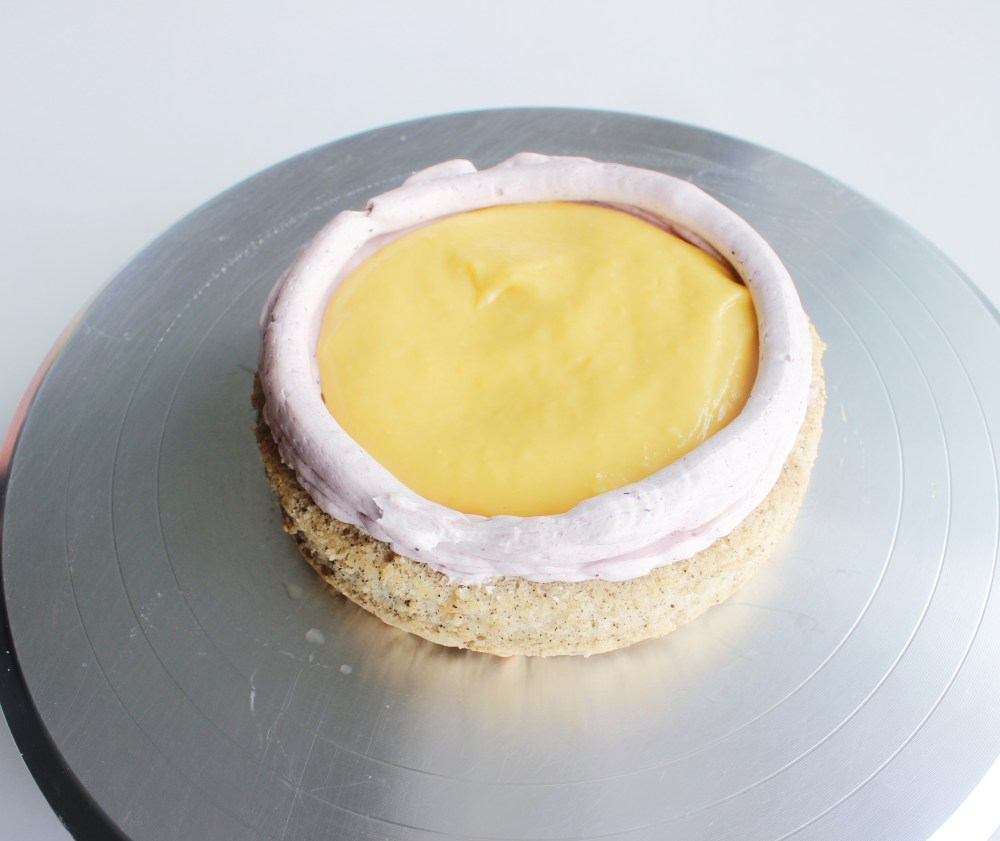
Start with one of your regular cake rounds, and layer on about 2 tbsp of frosting onto it in an even layer. Then pipe a border on the edges of the round in buttercream and fill that border with half of the curd. Then repeat these steps with the next round, preferably using the scrappy round in the middle. Then place on the last cake round, and using an offset spatula, gently spread any buttercream that has pushed out of the sides into a flat, even coating around the cake. This will form your crumb coat. Freeze the cake at this stage for at least 1 hour. Then spread your buttercream around the cake, scraping off any excess, and with any remaining buttercream, pipe this on top of your cake in an ornate border. Garnish the top of the cake with gold leaf and gold edible pearl sprinkles to finish.