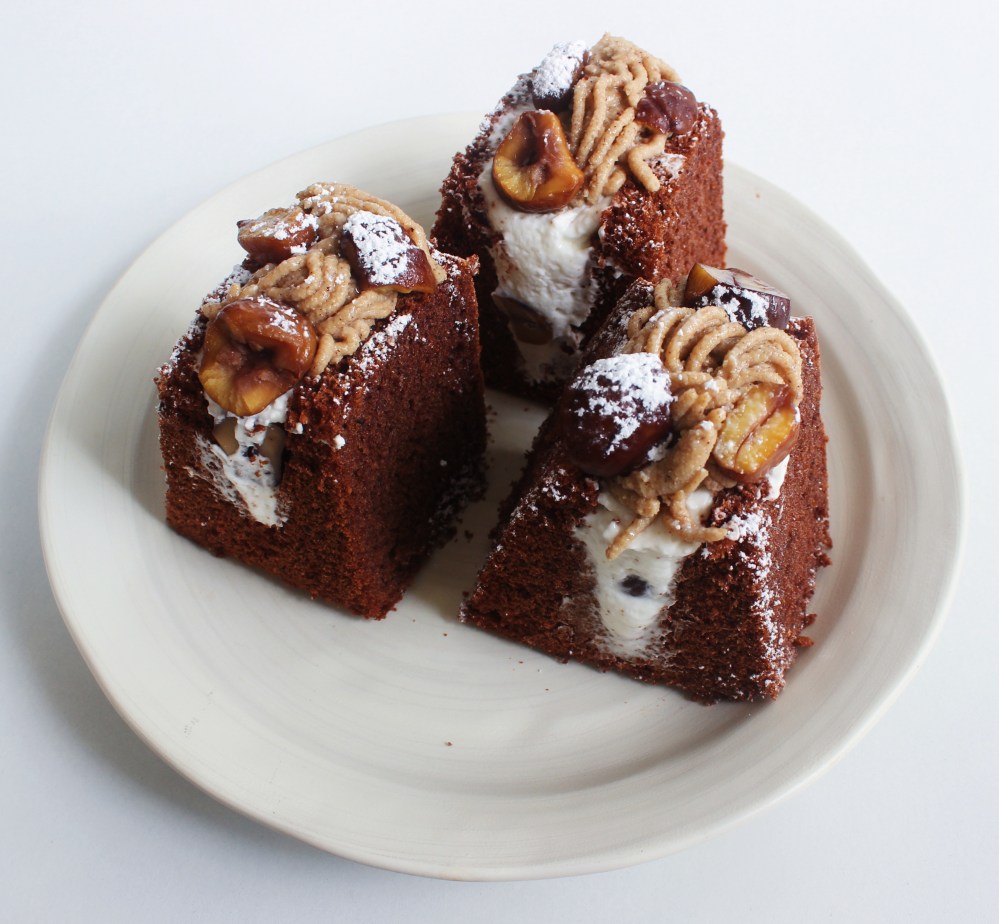
My favorite after school snack my mom would get for me was the mont blanc from JJ Bakery in Torrance. Their mont blanc consisted of a fluffy chocolate sponge cake with chestnuts and chantilly cream in the middle, and a generous piping of the creamy chestnut puree on top. It was soft, light, nutty, and made me feel like a bougie French person who just happened to be living in a southern Los Angeles suburb. What I love about mont blanc is that it is a really versatile dessert – the general definition of it is a dessert that has a generous piping of chestnut puree and dusting of powdered sugar on top of it, making the whole thing resemble a snow-capped mountain. The phrase “mont blanc” is French for “white mountain” for that sole reason! However, that chestnut puree can be paired with a lot of different things. I’ve seen iterations where it is served with cake, shortbread, meringue, ice cream, there are so many different ways you can serve a mont blanc! I have personally even done desserts that are mont blanc, but using a completely different ingredient than chestnut, such as a strawberry mousse or whipped sweet potato! For this iteration, I wanted to do a callback to that JJ Bakery Mont Blanc, using a soft chocolate chiffon cake with fresh cream, chestnuts, and a chestnut puree on top to finish, but in this case, in the form of a cute chiffon cake sandwich. One trend I have been seeing since late 2022 is taking a chiffon cake and slicing it into wedges, and then cutting slits into the wedges to pipe fillings into those to make them look like sandwiches. I personally love the way that looks, and the idea of doing that with the mont blanc I grew up eating sounded too perfect of an idea to pass up on!
For the components, we have a chocolate chiffon cake, a fresh cream studded with roasted chestnuts, a brown butter-chestnut puree, and powdered sugar to finish. So for the chiffon cake, I love making gluten-free chiffon cakes for my chiffon cake sandwiches, just because they are even lighter in texture than a chiffon cake made with wheat flour, but I listed variations for both a standard chocolate chiffon and a gluten-free chocolate chiffon for your reference! To also tie back in with the mont blanc and chestnut flavoring, I listed the option to use chestnut flour in the actual batter itself, just to reinforce the chestnut taste throughout! The thing about chocolate, and this is coming from a chocolate-loving fiend, is that it can be overpowering to other flavors, so using chestnut flour in the cake, plus the roasted chestnuts and the chestnut puree helps to accomplish that flavor balance against a cake that is only partially flavored with chocolate. That and this way, the cocoa powder in the cake provides a pleasant earthy background note to the chestnut! I very much love the flavor combination of chestnut with brown butter, while the cocoa in the cake just adds another warming and comforting flavor to it, without overpowering the more subtle chestnut flavor. The majority of this recipe is relatively easy to do, especially with a stand mixer(I feel like a broken record saying that, but it is true for like 99.9% of my recipes on this blog). In terms of technical difficulty, I would say that the biggest challenge is the cake.
Gluten-free or not, chiffon cake is a rather testing sponge to get right. The batter is leavened with a lot of whipped egg whites, and the thing about baked goods that use whipped egg whites to leaven them is that they can be very temperamental. If you take the chiffon cake out too early, it will collapse and be dense and eggy. If you overbake the chiffon cake, it will taste like saw dust. The egg whites themselves need to be whipped to stiff peaks. If you are trying to do this by hand(which I used to have to do back in high school when my mom refused to get me a stand mixer), it can be a lot of work. Stiff peak meringues refer to egg whites that have been whipped so thoroughly that when you pull the whisk away from it, the meringues stand up straight. It requires a lot of whisking, which is why a stand mixer makes that process 100% easier. But again, if you are doing this by hand, one thing I found that made the process easier is whisking the egg whites to soft peaks first, then gradually adding the sugar while whipping them. If you add sugar to egg whites and whip them by hand like that, it takes twice as long to incorporate air into the whites. So just keep that in mind if you are attempting to make a chiffon cake without a mixer. My batter uses a lot of egg yolks, which provide fat, and milk to help mitigate the risk of the cake running dry. Since we are making the chiffon cake in a traditional deep chiffon cake pan with the little chimney in the middle, you still need to bake the cake for basically an hour, since those are very large cakes. To guarantee a light sponge, I like to flip my chiffon cake upside down while it is cooling so that the cake does not collapse upon itself, and it will firm up with more air bubbles in the crumb. This is a trick that the Italians do with panettone(Italian fruit cake) to give it a lighter texture, and it very much applies for chiffon cake as well!
Makes 8 sandwiches:
For the chocolate chiffon cake:
6 eggs, separated
3/4 cups granulated sugar
1 tsp vanilla extract
1/4 cup canola oil
a pinch of salt
1/4 cup milk
3/4 cups all-purpose flour(replace with 2/3 cup mochiko, 1/4 cup chestnut flour/tapioca starch, and 1/4 tsp xanthan gum if you want this to be fully gluten-free)
1/4 cup cocoa powder
1 tsp baking powder
In a bowl, whip the egg whites with sugar to stiff peaks. In another bowl, whisk the egg yolks with vanilla, canola oil, salt, and milk until combined. Into the egg yolk mixture, sift the flours, cocoa powder, and baking powder. Fold into that the egg whites to form your batter. Pour the batter into an 8-inch chiffon cake mold. Bake at 350 degrees F for 50 minutes first. Then turn off the oven, and let the cake sit in the oven for 10 minutes, with the oven door slightly opened. Finally, take the cake out, flip upside down, and allow the cake to cool completely, while upside down, at room temperature.
Once the cake is fully cooled, scrape the sides away from the tin using an offset spatula. Then gently remove the cake from the pan. Cut the cake into 8 pieces, cutting each piece halfway down the middle to create slits. Store these cakes in an airtight container.
For the brown butter-chestnut puree:
2oz roasted and peeled chestnut
1oz brown butter
2oz whole milk
1oz heavy cream
a pinch of salt
In a blender or a food processor, puree everything until combined. Pass through a sieve to remove any lumps and transfer to a piping bag with a “spaghetti” tip. It is highly important to sieve the puree so that you don’t have lumps when piping the puree.
For the fresh cream:
1/2 cup heavy cream
a pinch of salt
2 tbsp confectioner’s sugar
1 tsp vanilla extract
In a bowl, whip everything together until stiff peaks form. Transfer to a piping bag.
To garnish:
Roasted and peeled chestnuts
Confectioner’s sugar
Cut the cake into 8 slices. Place the slices on the larger rounded side and cut them halfway down the middle to form a slit. Pipe into the slit your cream, and place chestnuts in the middle as well. Pipe more cream on top, and finish with your chestnut puree, some roasted chestnut, and confectioner’s sugar to finish.

