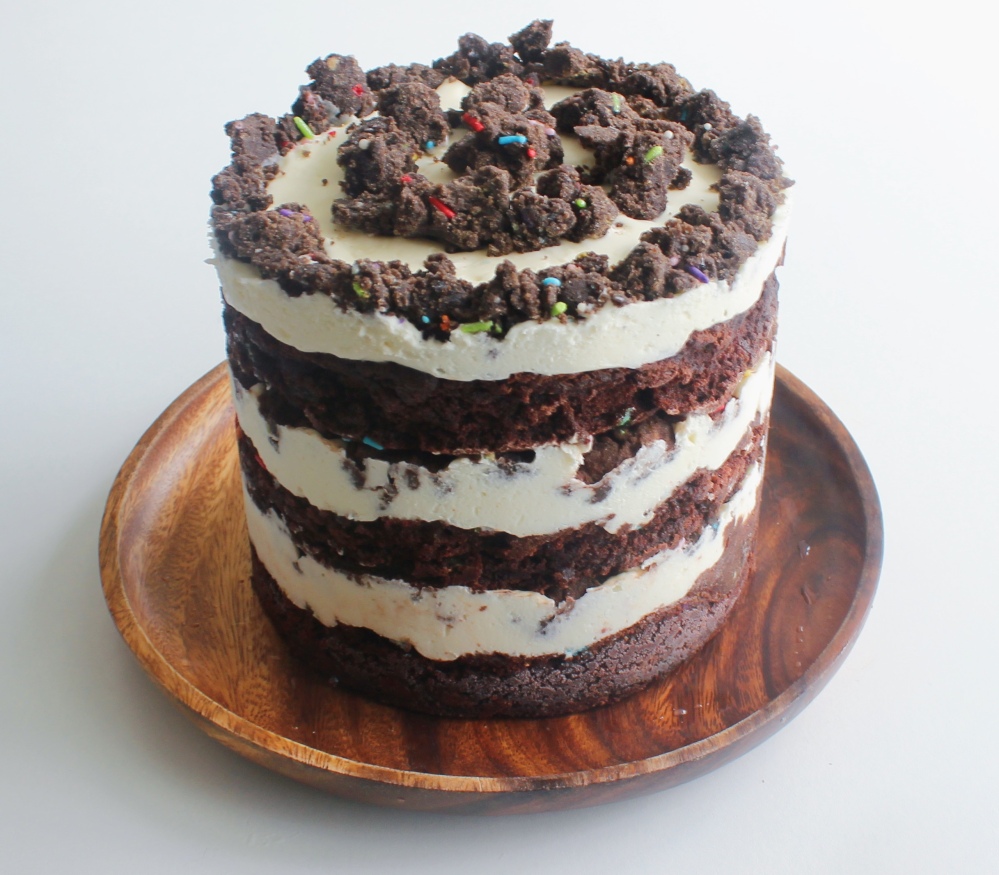
So back when I worked at Milkbar, my least favorite cake to assemble was the chocolate birthday cake. Now, don’t get me wrong, I love eating chocolate cake. However, when it came to assembling this one, it was tricky. At Milkbar, at least for their actual bakery operation, each layer of buttercream needs to be clean. However, when you are trying to spread a pure white-colored buttercream onto a dark brown chocolate cake, that has been soaked, chances are, bits of crumb, or chunks of crumb, can get pulled up into the buttercream. And that would just look messy, and earn you the ire of the bakery manager on duty. Fun fact, but Samantha from Masterchef season 9 and I actually trauma-bonded over this, because we both ran into issues where when we would try to spread that buttercream, it would just make a mess, tearing up and pulling crumb from the cake itself into it. The solution I was eventually taught(thanks to my former co-worker, Karen!), was to have a very light hand with your bent spoon, and do not press firmly down as you spread the buttercream. And without fail, Karen’s method worked beautifully. Now my other gripe with the chocolate Milkbar/birthday cake, and this is one I came to later somewhat understand why it is the way that it is, was that the crumb/crunch layer in the one we would make was vanilla-flavored. So even though the cake itself was chocolate-funfetti, the crumb was distinctly not that. It always bugged me, because I always felt like the crunch/crumb was meant to be an extension of the sponge itself, and this was clearly not. So for my rendition on this cake, I opted for a chocolate-funfetti crunch itself. Come to later realize, that a chocolate crunch in general kind of looks like poop. And with the sprinkles mixed into it, it kind of looks like dog poop after the dog has eaten corn. You are welcome for that traumatizing visual. If I didn’t say it, some Internet asshole would have anyways.
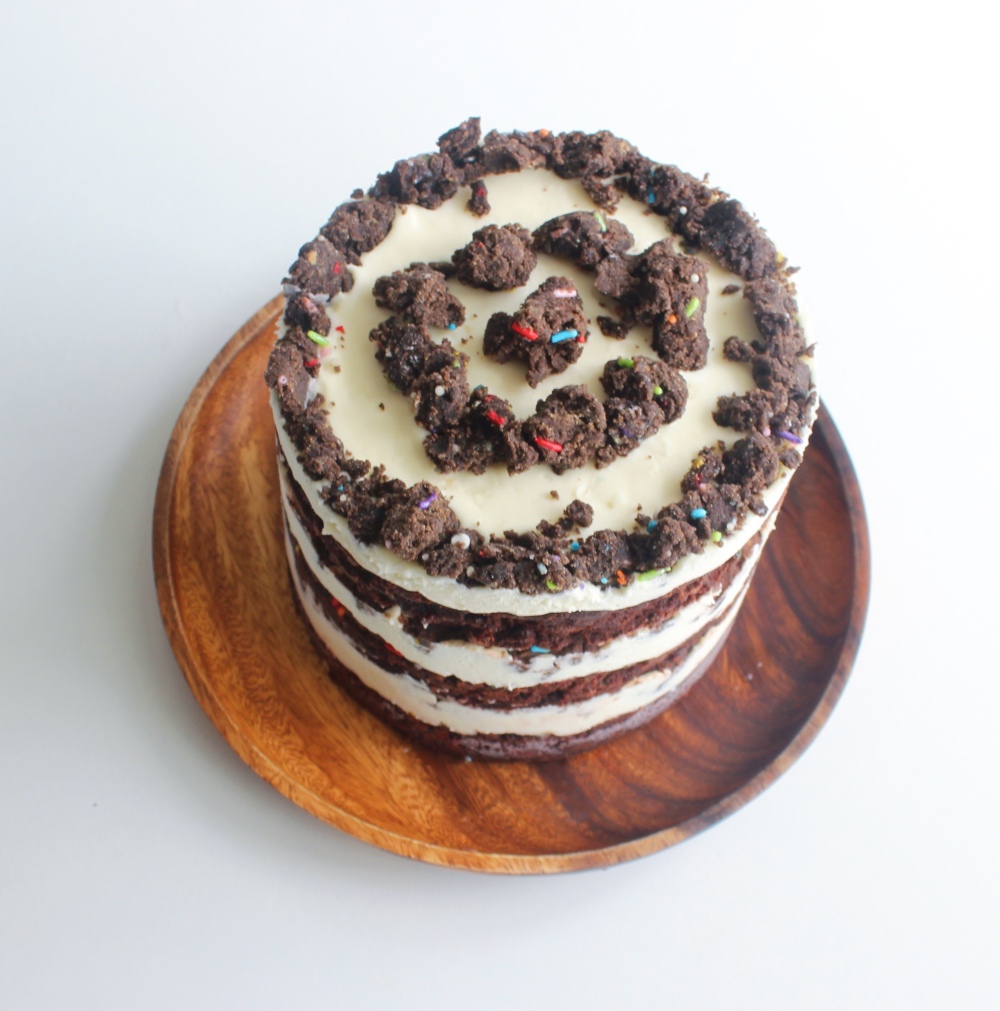
For the components, we have a chocolate funfetti cake, a vanilla buttercream that is infused with cream cheese, a Ovaltine soak, and chocolate-funfetti crumb. And the whole thing is gluten-free! In lieu of regular flour, I opted to use a combination of mochiko(glutinous rice flour) and kinako. Mochiko, despite the misleading name, contains no gluten, and is often used in desserts like mochi. Kinako is a toasted soy bean powder that is completely vegan and gluten-free, and tastes like peanut butter, it pairs very nicely with chocolate, giving it a pleasant nutty background that works well with the smoky cocoa notes. The soak is made with Ovaltine powder, but if you do not want to use that/have it handy, you can just substitute the Ovaltine with half the amount in cocoa powder for a similar effect. Lastly, since this is a Milkbar-style cake, you always need to have a 6-inch ring mold handy to cut and shape the cake with. You can also use acetate, which is what I used in the bakery and for this recipe, to line the sides of the mold with, but if you somehow decided to make this recipe without it, parchment works fine too. The one caveat with using parchment over acetate is that the sides will be less flat/clean-looking, so just keep that in mind! All in all, this cake conjured up hilarious and memories or my time on the Milkbar assembly line, and I am still forever-grateful for my time there!
For the cake batter:
1 stick unsalted butter
2 egg whites
1 cup granulated sugar
1 tsp vanilla extract
a pinch of salt
1 1/4 cup buttermilk
1/4 cup canola oil
1 whole egg
1 1/4 cups kinako
1 cup mochiko
1/2 cup cocoa powder
1/4 tsp xanthan gum
1 tsp baking soda
1/2 tsp baking powder
1/2 cup rainbow sprinkles, plus more for garnish
In a bowl, cream together the butter, egg whites, sugar, vanilla, and salt with a whisk attachment until the butter has doubled in size and is pale white in color. In a cup, mix together the buttermilk, canola oil, and whole egg. In another bowl, sift together the kinako, mochiko, cocoa powder, xanthan gum, baking soda, baking powder, and toss into that mixture your rainbow sprinkles. Alternate between fold into the butter-egg white mixture your buttermilk-egg mixture and the flour-cocoa powder-sprinkle mixture, adding in about 1/4 of each into the butter at a time, then mixing. Pour the mixed batter onto a lined quarter sheet tray, and spread into an even layer, spread over the surface of the entire sheet tray. Layer on more of the rainbow sprinkles on top, and then bake the cake at 350 degrees F for 30 minutes. Allow the cake to fully cool before cutting out 2 6-inch rounds, and then forming a third using the scraps.
For the crunch:
1 1/4 cups kinako
1/4 cup cocoa powder
1/2 tsp baking powder
1/4 tsp xanthan gum
1/2 cup granulated sugar
1/4 cup rainbow sprinkles
1/3 cup canola oil
a pinch of salt
In a bowl, mix everything together until a dough forms. Split the dough into thumbnail-sized pieces and spread that onto a lined sheet pan. Bake at 350 degrees F for 20 minutes. Allow your crunch to cool before using in assembly.
For the Ovaltine soak:
1 cup milk
2 tbsp Ovaltine powder
a pinch of salt
Mix ingredients together to form your soak. Keep refrigerated until time to assemble.
For the cream cheese buttercream:
8oz cream cheese
1 stick unsalted butter, at room temperature
1/2 cup confectioner’s sugar
a pinch of salt
1 tsp vanilla extract
1/4 cup milk
In a bowl, whisk together the cream cheese, butter, sugar, salt, and vanilla until everything is combined, lump-free, and is a smooth, spreadable consistency. Whisk into that the milk to finish.
For assembly:
Line a 6-inch ring mold with acetate, and place onto a lined sheet tray that can fit into your freezer. Lay down the scrap layer of the cake first, then add in 1/3 of the soak. Then spread on 1/3 of the buttercream, and sprinkle in about 2oz of the crunch. Repeat these steps for the second layer. For the third layer, start with the cake, soak, and spread an even layer of buttercream on top. Freeze the cake for at least 2 hours first, then unmold the cake, before transferring to a desired serving surface and garnishing the top with more crunch.