I was honestly not 100% sure what I was going to make for Pride this year. A huge deterrent for me in regards to making rainbow desserts is having to divide and portion something by 7, and then dying each piece one of the colors of the rainbow. Even with this recipe, which normally I could make a mousse cake, even with multiple additional components, with 2 hours of active time, from making a cake to the filling, the mousses, the glaze, and the topping, it ended up taking 2 hours of active time just to dye all of my rainbow components alone(1 hour per rainbow-colored component). It is REALLY time-consuming. Dividing things by 7, which is probably one of the more annoying numbers to divide by, dying each thing with a combination of natural coloring powders, making sure that the colors don’t bleed into each other, it’s a lot of work. So needless to say, while I love Pride Month, Pride-colored desserts are honestly up there in terms of some of the more challenging desserts I have to make, as a function of just how time-consuming and borderline exhausting they are to color. Not to say that it’s not fun. One of the absolute most satisfying feelings is seeing your rainbow-themed dessert coming together, and for all of the colors to be represented properly. However, I did have plans to do a Venus Fleur-themed cake on my to-bake list, and I figured, out of everything on that list, that concept might be the easiest to translate into a rainbow-themed dessert, and that’s how this final cake concept sort of came about!
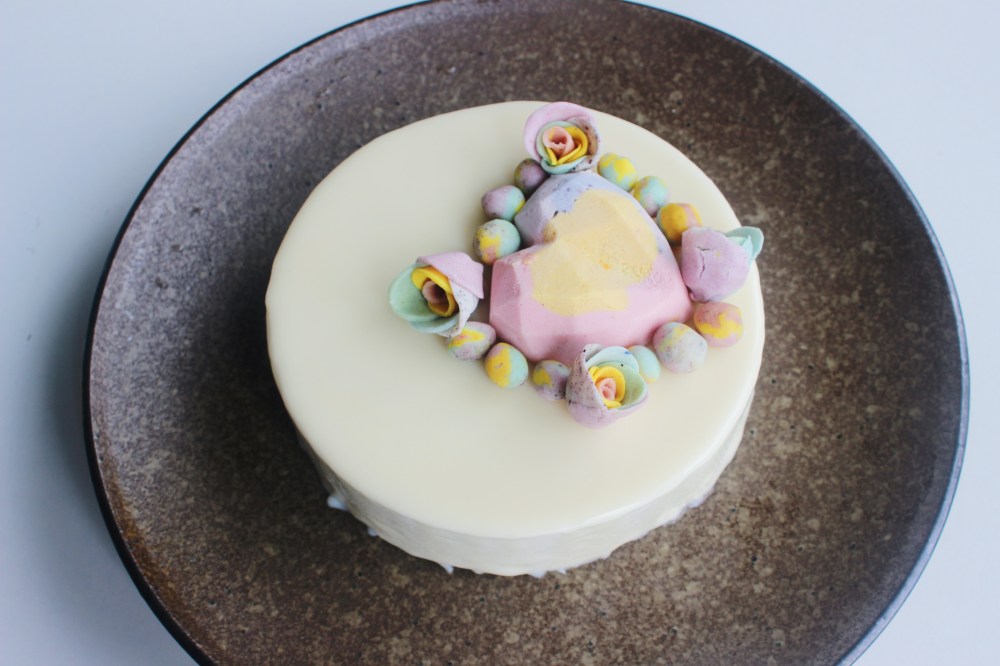
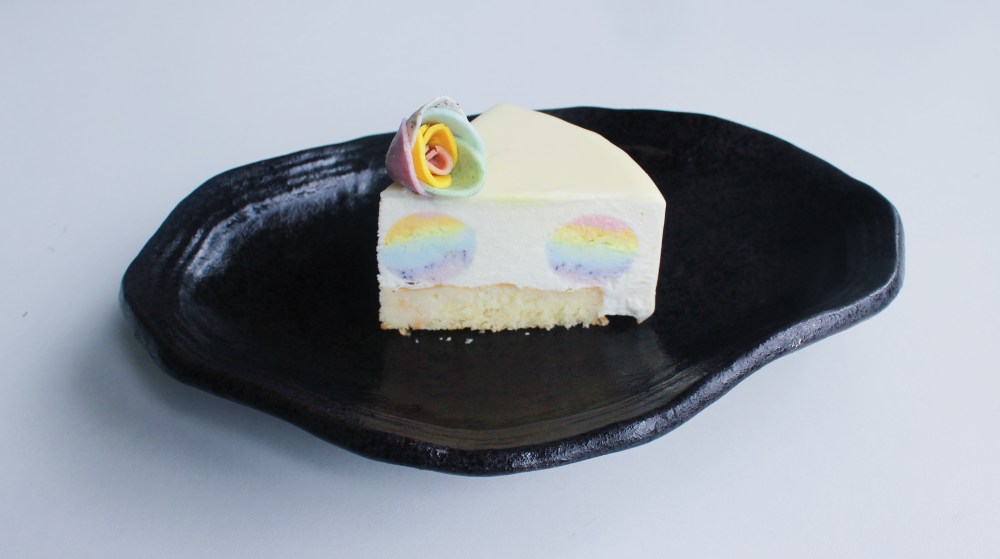
The original Venus Fleur cake was going to be a vanilla cake with a mousse, and modeling chocolate roses to garnish the top of the cake with. Relatively straightforward, simple, and a perfect blank canvas that I could customize with this rainbow color motif. I used the seven colors of the rainbow in essentially two components – mousse balls that are inside of the cake, and modeling chocolate decorations on top. The mousse balls took a long time to come together, mostly because I had to layer these mousses up in these small 1-inch spheres. I actually wound up having a little more mousse than the capacity of my sphere molds. Luckily, I had heart-shaped silicone molds, perfect for Pride, and I opted to pour my remaining mousses into that just not to waste them. After spending an hour coloring out each of these mousses for those spheres, I was definitely not just going to throw the rest away! Now the white modeling chocolate, that was pain. Modeling chocolate, when made from scratch, takes a lot of time and cooling down, otherwise you will either end up with a hard and lumpy or sticky and greasy mess. Dying the modeling chocolate took an hour, while rolling out and assembling the modeling chocolate into roses took another hour. I was happy with how the roses came out, and in an ideal world, I probably would have made at least seven to be cheeky, but my patience was worn pretty thin at that point, so just to have something else, I made little balls out of the remaining rainbow-colored modeling chocolate, and used those as a decoration on top as well. I used natural food coloring powders for my recipe, but feel free to use gel food coloring for yours. I didn’t bother specifying measurements, since I added the powders, pinch by pinch, to each dyed components until I found the color to be acceptable, and if you are using food coloring, just be sure to add it little by little between mixing so that you can make sure that the color is to your liking!

The other components came together really quickly compared to the dyed ones. The vanilla cake took all of 25 minutes to make, from start to finish. I used vanilla bean paste in this recipe to be a little bougie, but regular vanilla extract works too. Just be sure, if using the extract, to add it at the end of the recipe then, just in case it is the alcohol-based one, since that will evaporate off if heated up too early. I went with a white sesame mousse, half because if this was all-vanilla, that would be really boring for a Pride cake, and half because so many different cuisines use sesame, so I felt like it a pleasant unifier! I went with a white chocolate mirror glaze just because I wanted the exterior to be this completely white color, just to add a little surprise and shock when you cut into the cake, and you’ll see these beautiful rainbow-colored spheres inside. That and the white contrasts gorgeously with the rainbow-colored decorations on top, which might either be cheeky hint to what’s inside the cake, or where you expect the rainbow colors to end with this dessert. All in all, it was a really delicious, light, and airy mousse cake, and while the rainbow-dying portion of this recipe probably ups what should be a 6/10 in difficulty all the way to a 9.5/10, it is still such a satisfying cake to look at, cut into, and enjoy, be it on Pride or for any other occasion!
Makes 1 6-inch mousse cake:
For the rainbow mousse balls:
60g white chocolate
4g unsalted butter
14g gelatin powder + 1 tbsp water
90g heavy cream
red beet powder
turmeric powder
green spirulina powder
blue spirulina powder
freeze-dried blueberry powder
purple yam powder
Melt 20g of the heavy cream with the white chocolate, gelatin, and unsalted butter. Once everything is melted together, allow the white chocolate to cool down to room temperature, making sure it is still soft in consistency. Whip the remaining heavy cream to stiff peaks. Divide the white chocolate into seven portions, dying each using natural food coloring powders, and fold 10g heavy cream into each portion to form the layers for your mousse balls. I used red beet for red, turmeric for yellow, equal parts red beet and turmeric for orange, green spirulina for green, blue spirulina for blue, blueberry powder with a pinch of blue spirulina for indigo, and purple yam for purple. Or you can just use food coloring gels if that’s easier. Transfer each to a piping bag.
With 1/2-inch half sphere silicone molds, start by piping a dot of the red mousse into half of the molds. Then in the other half, pipe in the a dot of the purple. Tap the molds down, just to help the layers spread down flat and even. Then in the red, add in the orange, and to the orange, add in the indigo. Repeat the tapping down, piping in more mousse as necessary to form a full, flat layer. Then add in the yellow on top of the orange, and the blue on top of the indigo. Then spread the green over half of the mousse molds. Pour any remaining mousse into a heart-shaped silicone mold. Freeze the mousses solid, before pressing the mousse sphere halves together to form your mousse balls – be sure that the mousse ball halves are different colors so that each mousse ball will have all seven colors of the rainbow!
For the vanilla chiffon cake:
1 egg, separated
2 tbsp granulated sugar
2 tbsp canola oil or brown butter
a pinch of salt
1/4 tsp vanilla bean paste
1/4 cup all-purpose flour
1/4 tsp baking powder
In a bowl, whip the egg white with granulated sugar to stiff peaks. In another bowl, whisk the egg yolk with the oil/butter, salt, and vanilla bean. Sift into the egg yolk the flour and baking powder, then fold into that the egg white. Spread the cake batter on a lined sheet tray and bake at 350 degrees F for 15 minutes. Allow the cake to fully cool before cutting out 5-inch rounds. You will only need one for this recipe, so reserve any spare to use for any other recipe that will call for a vanilla chiffon cake(I personally love eating that cake with cream and fruit!).
For the vanilla milk soak:
1/4 cup milk
a pinch of salt
1/4 tsp vanilla bean paste
Mix together to form your soak. Pour over the cake.
For the white sesame mousse:
1/4 cup milk
1 tsp vanilla bean paste
2oz tahini paste
1/4 cup granulated sugar
2 tsp gelatin powder + 2 tbsp cold water
8oz heavy cream, whipped stiff
In a pot, melt down all of the ingredients, sans heavy cream, over medium heat until everything is dissolved together. Allow the mixture to cool down to just above room temperature before folding in the cream to form your mousse base.
For the initial assembly:
Line a 6-inch ring mold with acetate and cling wrap. Pour in about 1/2 of your white sesame mousse, and press in half of your rainbow mousse balls. Then repeat that step again. Finally, press in the cake and then freeze everything solid, at least 3-4 hours, before attempting to unmold.
For the rainbow modeling chocolate:
90g white chocolate
11g corn syrup
a pinch of salt
red beet powder
turmeric powder
green spirulina powder
blue spirulina powder
freeze-dried blueberry powder
purple yam powder
Melt the white chocolate over a double boiler with the corn syrup and salt. Allow the white modeling chocolate to cool down and firm up, before dividing it into seven portions. Dye each portion each color of the rainbow using your food colorings – refer back to how I dyed the mousses for how I dyed the modeling chocolate! To form your petals for the roses, I rolled out each modeling chocolate on a nonstick surface, and cut out 1/2-inch disks. I crimped the sides of the disks and rolled each around each other to form the roses, making sure that each rose was made with 7 petals, one of each color of the rainbow. With the remaining scraps of your modeling chocolate, carefully layer them together and divide them into smaller pieces, rolling them into little spheres or “pearls” to garnish the top of the cake with. Store in the freezer until time to use.
For the mirror glaze:
2oz milk
12g gelatin powder + 2 tbsp cold water
4oz white chocolate chips
a pinch of salt
In a pot, melt down the gelatin into the milk. Pour into that the white chocolate and salt and let the white chocolate slowly melt down into the milk as well, passing the glaze through the sieve to remove the lumps. Allow the glaze to cool down to 90 degrees F before attempting to use.
For final assembly:
Place the still-frozen mousse cake onto an elevated surface(I used a deli cup placed on top of a deep plate that is wider in diameter than the mousse cake), and pour on the glaze. Allow the excess glaze to drip off and solidify, and then garnish the top with the rainbow mousse heart and the rainbow modeling chocolate roses and pearls to finish.